1.课程大纲 #
1.1 Vite2+Vue3+Typescript 搭建开发环境 #
- 安装使用vite2
- 支持vue3
- 支持typescript
- 支持eslint、prettier和editorconfig
- git hooks
- 别名
- 样式
- 静态资源
- mock
- axios请求封装
- pinia状态管理
- 路由
- NaïveUI组件库
- 环境变量和模式
1.2 rollup和vite2插件系统和自定义插件 #
1.3 从零实现vite2 #
2.安装 vite #
2.1 vite 介绍 #
- Vite (法语意为 "快速的",发音 /vit/) 是下一代前端开发与构建工具
- 💡 极速的服务启动 使用原生 ESM 文件,无需打包!
- ⚡️ 轻量快速的热重载 无论应用程序大小如何,都始终极快的模块热重载(HMR)
- 🛠️ 丰富的功能 对 TypeScript、JSX、CSS 等支持开箱即用。
- 📦 优化的构建 可选 “多页应用” 或 “库” 模式的预配置 Rollup 构建
- 🔩 通用的插件 在开发和构建之间共享 Rollup-superset 插件接口。
- 🔑 完全类型化的 API 灵活的 API 和完整 TypeScript
2.2 vite 安装 #
pnpm install vite -D3.启动 vite #
- https://esbuild.github.io
- Vite 主要由两部分组成
- 一个开发服务器,它基于 原生 ES 模块 提供了 丰富的内建功能,如速度快到惊人的 模块热更新(HMR),Vite 将会使用
esbuild预构建依赖。Esbuild使用Go编写,并且比以 JavaScript 编写的打包器预构建依赖快 10-100 倍 - 一套构建指令,它使用 Rollup 打包你的代码,并且它是预配置的,可输出用于生产环境的高度优化过的静态资源
- 一个开发服务器,它基于 原生 ES 模块 提供了 丰富的内建功能,如速度快到惊人的 模块热更新(HMR),Vite 将会使用
3.1 package.json #
{
  "scripts": {
    "dev": "vite",
    "build": "vite build"
  }
}
3.2 vite.config.js #
import { defineConfig } from "vite"
export default defineConfig({})
3.3 index.html #
index.html
<!DOCTYPE html>
<html lang="en">
  <head>
    <meta charset="UTF-8" />
    <meta name="viewport" content="width=device-width, initial-scale=1.0" />
    <title>Vite App</title>
  </head>

  <body>
    <div id="app"></div>
    <script type="module" src="/src/main.ts"></script>
  </body>
</html>
3.4 src\env.d.ts #
- Vite 默认的类型定义是写给它的 Node.js API 的,要将其补充到一个 Vite 应用的客户端代码环境中
- 客户端类型
- 如果你的库依赖于某个全局库
- 使用
///指令 - 三斜线指令仅可放在包含它的文件的最顶端
- 三斜线引用告诉编译器在编译过程中要引入的额外的文件
- 使用
/// <reference types="vite/client" />3.5 src\main.ts #
src\main.ts
export function render() {
document.getElementById("app")!.innerHTML = "main";
}
render();
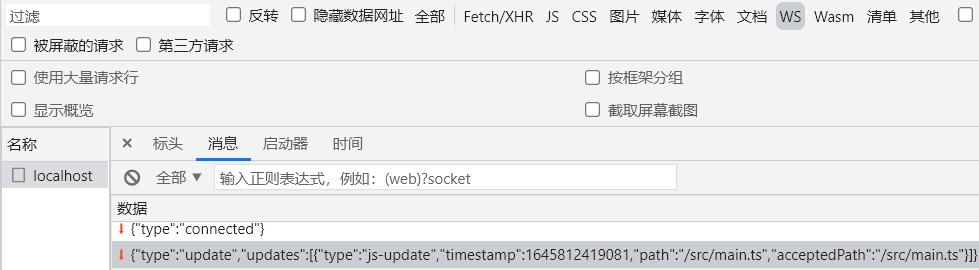
if (import.meta.hot) {
import.meta.hot.accept((updatedModule) => updatedModule.render());
}
3.6 tsconfig.json #
tsconfig.json
{
  "compilerOptions": {
    "target": "esnext",
    "module": "esnext",
    "moduleResolution": "node",
    "strict": true,
    "jsx": "preserve",
    "sourceMap": true,
    "esModuleInterop": true,
    "lib": ["esnext", "dom", "es2018.promise"]
  },
  "include": ["src/**/*.ts", "src/**/*.d.ts", "src/**/*.tsx", "src/**/*.vue"]
}| 参数 | 解释 |
|---|---|
| target | 用于指定编译之后的版本目标 |
| module | 生成的模块形式:none、commonjs、amd、system、umd、es6、es2015 或 esnext 只有 amd 和 system 能和 outFile 一起使用 target 为 es5 或更低时可用 es6 和 es2015 |
| moduleResolution | 选择模块解析策略,有 node 和 classic 两种类型 module-resolution |
| strict | 是否启动所有类型检查 |
| jsx | react 模式会生成 React.createElement,在使用前不需要再进行转换操作了,输出文件的扩展名为.js |
| sourceMap | 把 ts 文件编译成 js 文件的时候,同时生成对应的 sourceMap 文件 |
| esModuleInterop | 为导入内容创建命名空间,实现 CommonJS 和 ES 模块之间的互相访问 |
| lib | 编译时引入的 ES 功能库,包括:es5 、es6、es7、dom 等。如果未设置,则默认为: target 为 es5 时: ["dom", "es5", "scripthost"] target 为 es6 时: ["dom", "es6", "dom.iterable", "scripthost"] |
| include | include 也可以指定要编译的路径列表,但是和 files 的区别在于,这里的路径可以是文件夹,也可以是文件 |
3.7 .gitignore #
.gitignore
node_modules
pnpm-debug.log*
.vscode/*
sh.exe.stackdump
dist
coverage
4.支持 vue3 #
4.1 安装 vue #
pnpm install vue
pnpm install @vitejs/plugin-vue -D
4.2 vite.config.ts #
vite.config.ts
import { defineConfig } from 'vite'
+import vue from "@vitejs/plugin-vue";
export default defineConfig({
+ plugins: [vue()]
})
4.3 src\env.d.ts #
src\env.d.ts
/// <reference types="vite/client" />
+declare module "*.vue" {
+  import type { DefineComponent } from "vue";
+  const component: DefineComponent<{}, {}, any>;
+  export default component;
+}
4.4 src\main.ts #
src\main.ts
+import { createApp } from "vue";
+import App from "./App.vue";
+const app = createApp(App)
+app.mount("#app");
4.5 src\App.vue #
src\App.vue
<script setup lang="ts">
import HelloWorld from './components/HelloWorld.vue'
</script>

<template>
  <HelloWorld msg="Vue3 + TypeScript + Vite2" />
</template>

<style></style>
4.6 HelloWorld.vue #
src\components\HelloWorld.vue
- 单文件组件
<script setup>是在单文件组件 (SFC) 中使用组合式 API 的编译时语法糖 - lang属性可以声明预处理语言
ref接受一个内部值并返回一个响应式且可变的 ref 对象。ref 对象仅有一个.value属性,指向该内部值,在 JS 中操作数据需要.value,在模板中读取不需要.value- 在
<script setup>中必须使用 defineProps API 来声明 props,只在<script setup>中才能使用的编译器宏。他们不需要导入且会随着<script setup>处理过程一同被编译掉
<script setup lang="ts">
import { ref } from 'vue'
import logoUrl from '../assets/logo.png'
defineProps<{ msg: string }>()
const count = ref(0)
</script>
<template>
<h1>{{ msg }}</h1>
<img :src="logoUrl" />
<div>
<button type="button" @click="count++">count is: {{ count }}</button>
</div>
</template>
<style scoped>
img {
width: 100px;
height: 100px;
}
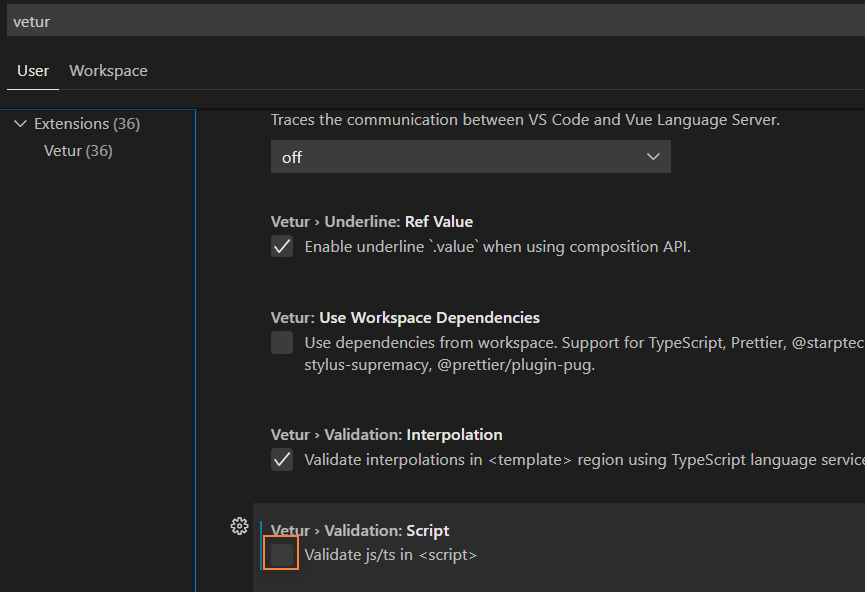
</style>5.支持 typescript #
- 只编译不校验
5.1 安装 #
- typescript是一种基于 JavaScript 的强类型编程语言
- vue-tsc可以对 Vue3 进行 Typescript 类型较验
pnpm install typescript vue-tsc -D5.2 package.json #
package.json
{
  "scripts": {
    "dev": "vite",
+   "build": "vue-tsc --noEmit && vite build"
  },
}
5.3 msg.ts #
src\msg.ts
interface Msg {
  text: string;
}
const msg: Msg = {
  text: "zhufeng",
  age: 13
}

export default msg
5.4 App.vue #
src\App.vue
<script setup lang="ts">
import HelloWorld from './components/HelloWorld.vue'
+import msg from "./msg"
</script>

<template>
+  <HelloWorld :msg="msg.text" />
</template>

<style></style>
6.ESLint #
- ESLinteslint 是一个插件化并且可配置的 JavaScript 语法规则和代码风格的检查工具
- 代码质量问题:使用方式有可能有问题
- 代码风格问题:风格不符合一定规则
6.1 安装 #
pnpm install eslint eslint-plugin-vue @typescript-eslint/parser @typescript-eslint/eslint-plugin @vue/eslint-config-typescript -D| 名称 | 说明 |
|---|---|
| eslint | ESLint 是一个用于识别和报告在 ECMAScript/JavaScript 代码中发现的模式的工具 |
| eslint-plugin-vue | Vue 的官方 ESLint 插件 |
| @typescript-eslint/parser | 一个 ESLint 解析器,它利用 TypeScript-ESTree 允许 ESLint 检查 TypeScript 源代码 |
| @typescript-eslint/eslint-plugin | 一个 ESLint 插件,为 TypeScript 代码库提供 lint 规则 |
| @vue/eslint-config-typescript | Vue 的 eslint-config-typescript |
6.2 .eslintrc.js #
.eslintrc.js
module.exports = {
  root: true,
  env: {
    browser: true,
    es2021: true,
    node: true
  },

  extends: [
    "plugin:vue/vue3-recommended",
    "eslint:recommended",
    "@vue/typescript/recommended"
  ],
  parserOptions: {
    parser: "@typescript-eslint/parser",
    ecmaVersion: 2021
  },
  rules: {
    "no-unused-vars": "off",
    "vue/no-unused-vars": "off",
    "@typescript-eslint/no-unused-vars": "off"
  },
  globals: {
    defineProps: "readonly"
  }
}
6.3 .eslintignore #
.eslintignore
node_modules
dist
*.css
*.jpg
*.jpeg
*.png
*.gif
*.d.ts
6.4 package.json #
package.json
{
    "scripts": {
     "dev": "vite",
     "build": "vue-tsc --noEmit && vite build",
+    "lint": "eslint --ext .ts,.tsx,vue src/** --no-error-on-unmatched-pattern --quiet",
+    "lint:fix": "eslint --ext .ts,.tsx,vue src/** --no-error-on-unmatched-pattern --quiet --fix"
  },
}
7.Prettier #
- ESLint 主要解决的是代码质量问题
- 代码质量规则
- no-unused-vars 禁止出现未使用过的变量
- no-implicit-globals 禁止在全局范围内使用变量声明和 function 声明
- prefer-promise-reject-errors 要求使用 Error 对象作为 Promise 拒绝的原因
- prettier主要解决的是代码风格问题
- max-len 最大长度
- no-mixed-spaces-and-tabs 不允许空格和 tab 混合
- keyword-spacing 关键字的空
- comma-style 冒号风格
7.1 安装 #
pnpm install prettier eslint-plugin-prettier @vue/eslint-config-prettier -D| 名称 | 说明 |
|---|---|
| prettier | 代码格式化 |
| eslint-plugin-prettier | 作为 ESLint 规则运行得 prettier |
| @vue/eslint-config-prettier | Vue 的 eslint-config-prettier |
7.2 .eslintrc.js #
.eslintrc.js
module.exports = {
  root: true,
  env: {
    browser: true,
    es2021: true,
    node: true
  },

  extends: [
    "plugin:vue/vue3-recommended",
    "eslint:recommended",
    "@vue/typescript/recommended",
+   "prettier",
+   "@vue/eslint-config-prettier"
  ],
  parserOptions: {
    parser: "@typescript-eslint/parser",
    ecmaVersion: 2021
  },
  rules: {
+   "prettier/prettier": [
+     "error",
+     {
+       singleQuote: false,
+       tabWidth: 2,
+       indent: 2,
+       semi: false,
+       trailingComma: "none",
+       endOfLine: "auto"
+     }
+   ],
+   "no-unused-vars": "off",
+   "vue/no-unused-vars": "off",
+   "@typescript-eslint/no-unused-vars": "off"
+ },
  globals: {
    defineProps: "readonly"
  }
}
7.3 .prettierrc.js #
.prettierrc.js
module.exports = {
  singleQuote: false, //使用单引号
  semi: false, ////末尾添加分号
  tabWidth: 2,
  trailingComma: "none",
  useTabs: false,
  endOfLine: "auto"
}
7.4 .prettierignore #
.prettierignore
node_modules
dist
7.5 editorconfig #
- editorconfig帮助开发人员在不同的编辑器和 IDE 之间定义和维护一致的编码样式
- 不同的开发人员,不同的编辑器,有不同的编码风格,而 EditorConfig 就是用来协同团队开发人员之间的代码的风格及样式规范化的一个工具,而.editorconfig 正是它的默认配置文件
- EditorConfig
- vscode 这类编辑器,需要自行安装 editorconfig 插件
7.5.1 .editorconfig #
- Unix 系统里,每行结尾只有换行,即
\nLF(Line Feed) - Windows 系统里面,每行结尾是
换行 回车,即\r\nCR/LF - Mac 系统里,每行结尾是
回车,即\rCR(Carriage Return)
root = true
[*]
charset = utf-8
indent_style = space
indent_size = 2
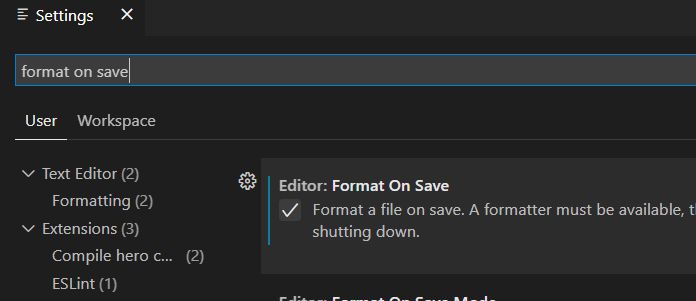
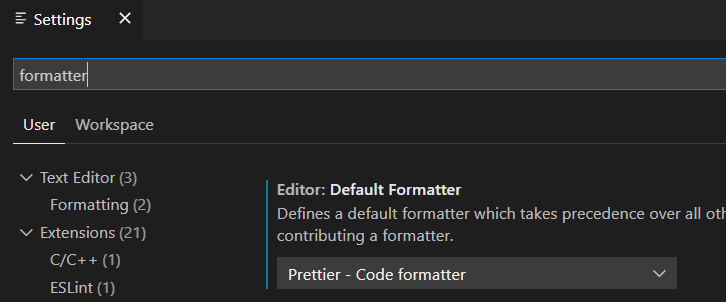
end_of_line = lf7.6 自动格式化 #
8.git hooks #
- 可以在
git commit之前检查代码,保证所有提交到版本库中的代码都是符合规范的 - 可以在
git push之前执行单元测试,保证所有的提交的代码经过的单元测试 - husky可以让我们向项目中方便添加
git hooks,它会自动在仓库中的.git/目录下增加相应的钩子,比如pre-commit钩子就会在你执行git commit命令的时候的触发 - lint-staged用于实现每次提交只检查本次提交所修改的文件
- mrm可以根据
package.json依赖项中的代码质量工具来安装和配置husky和lint-staged - Commitlint 可以规范
git commit -m ""中的描述信息
8.1 lint-staged #
8.1.1 安装 #
mrm安装lint-staged的同时会安装husky
pnpm install mrm  -D
npx mrm lint-staged
8.1.2 package.json #
package.json
{
  "name": "vite2vue3ts-prepare",
  "version": "1.0.0",
  "description": "",
  "main": "index.js",
  "scripts": {
    "dev": "vite",
    "build": "vue-tsc --noEmit && vite build",
    "lint": "eslint --ext .ts,vue src/** --no-error-on-unmatched-pattern --quiet",
    "lint:fix": "eslint --ext .ts,vue src/** --no-error-on-unmatched-pattern --fix",
+   "prepare": "husky install"
  },
  "keywords": [],
  "author": "",
  "license": "ISC",
  "dependencies": {
    "vue": "^3.2.31"
  },
  "devDependencies": {
    "@typescript-eslint/eslint-plugin": "^5.12.1",
    "@typescript-eslint/parser": "^5.12.1",
    "@vitejs/plugin-vue": "^2.2.2",
    "@vue/eslint-config-prettier": "^7.0.0",
    "@vue/eslint-config-typescript": "^10.0.0",
    "eslint": "^8.10.0",
    "eslint-plugin-prettier": "^4.0.0",
    "eslint-plugin-vue": "^8.5.0",
+   "husky": "^7.0.0",
+   "lint-staged": "^12.3.4",
+   "mrm": "^3.0.10",
    "prettier": "^2.5.1",
    "typescript": "^4.5.5",
    "vite": "^2.8.4",
    "vue-tsc": "^0.32.0"
  },
+ "lint-staged": {
+   "*.{ts,vue}": "eslint --cache --fix"
+ }
}
8.2 commitlint #
- commitlint推荐我们使用onfig-conventional配置去写
commit - 提交格式
git commit -m <type>[optional scope]: <description>type:用于表明我们这次提交的改动类型,是新增了功能?还是修改了测试代码?又或者是更新了文档?optional scope:一个可选的修改范围。用于标识此次提交主要涉及到代码中哪个模块description:一句话描述此次提交的主要内容,做到言简意赅
8.2.1 type #
| 类型 | 描述 |
|---|---|
| build | 编译相关的修改,例如发布版本、对项目构建或者依赖的改动 |
| chore | 其他修改, 比如改变构建流程、或者增加依赖库、工具等 |
| ci | 持续集成修改 |
| docs | 文档修改 |
| feature | 新特性、新功能 |
| fix | 修改 bug |
| perf | 优化相关,比如提升性能、体验 |
| refactor | 代码重构 |
| revert | 回滚到上一个版本 |
| style | 代码格式修改 |
| test | 测试用例修改 |
8.2.2 安装 #
pnpm install @commitlint/cli @commitlint/config-conventional -D8.2.3 配置 #
npx husky add .husky/commit-msg "npx --no-install commitlint --edit $1"8.2.4 commitlint.config.js #
module.exports = {
  extends: ["@commitlint/config-conventional"],
  rules: {
    "type-enum": [
      2,
      "always",
      [
        "build",
        "chore",
        "ci",
        "docs",
        "feature",
        "fix",
        "perf",
        "refactor",
        "revert",
        "style",
        "test"
      ]
    ]
  }
}
9.配置别名 #
9.1 vite.config.ts #
import { defineConfig } from "vite"
+import { resolve } from "path"
import vue from "@vitejs/plugin-vue"
export default defineConfig({
+ resolve: {
+   alias: {
+     "@": resolve("src")
+   }
+ },
  plugins: [vue()]
})
9.2 tsconfig.json #
tsconfig.json
{
  "compilerOptions": {
    "target": "esnext",
    "module": "esnext",
    "moduleResolution": "node",
    "strict": true,
    "jsx": "preserve",
    "sourceMap": true,
    "esModuleInterop": true,
    "lib": ["esnext", "dom", "es2018.promise"],
+   "baseUrl": ".",
+   "paths": {
+     "@/*": ["src/*"]
+   }
  },
  "include": ["src/**/*.ts", "src/**/*.d.ts", "src/**/*.tsx", "src/**/*.vue"]
}
9.3 App.vue #
src\App.vue
<script setup lang="ts">
+import HelloWorld from "@/components/HelloWorld.vue"
import msg from "./msg"
</script>

<template>
  <HelloWorld :msg="msg.text" />
</template>

<style></style>
10.样式处理 #
10.1 全局样式 #
10.1.1 src\global.css #
#app {
  background-color: lightgrey;
}
10.1.2 src\main.ts #
src\main.ts
import { createApp } from "vue"
import App from "./App.vue"
+import "./global.css"
const app = createApp(App)
app.mount("#app")
10.2 局部样式 #
- 当
style标签有scoped属性时,它的CSS只作用于当前组件中的元素 - 它使用了
data-v-hash的方式来使 css 有了它对应模块的标识
10.2.1 HelloWorld.vue #
src\components\HelloWorld.vue
<script setup lang="ts">
import { ref } from "vue"
import logoUrl from "../assets/logo.png"
defineProps<{ msg: string }>()
const count = ref(0)
</script>

<template>
  <h1>{{ msg }}</h1>
  <img :src="logoUrl" />
  <div>
    <button type="button" @click="count++">count is: {{ count }}</button>
  </div>
+ <a>超链接</a>
</template>

<style scoped>
img {
  width: 100px;
  height: 100px;
}
+a {
+  color: red;
+}
</style>
10.3 CSS Modules #
- 通过
module作用的style都被保存到$style对象中
10.3.1 内联 #
10.3.1.1 HelloWorld.vue #
src\components\HelloWorld.vue
<script setup lang="ts">
import { ref } from "vue"
import logoUrl from "../assets/logo.png"
defineProps<{ msg: string }>()
const count = ref(0)
</script>

<template>
  <h1>{{ msg }}</h1>
  <img :src="logoUrl" />
  <div>
    <button type="button" @click="count++">count is: {{ count }}</button>
  </div>
+ <a :class="$style.link">超链接</a>
</template>

<style scoped>
img {
  width: 100px;
  height: 100px;
}
</style>
+<style module>
+.link {
+  color: red;
+}
+</style>
10.3.2 外联 #
- 任何以
.module.css为后缀名的 CSS 文件都被认为是一个CSS modules文件 - 导入这样的文件会返回一个相应的模块对象
10.3.2.1 HelloWorld.module.css #
src\components\HelloWorld.module.css
.link {
    color: red;
}
10.3.2.2 HelloWorld.vue #
src\components\HelloWorld.vue
<script setup lang="ts">
import { ref } from "vue"
import logoUrl from "../assets/logo.png"
+import style from "./HelloWorld.module.css"
defineProps<{ msg: string }>()
const count = ref(0)
</script>

<template>
  <h1>{{ msg }}</h1>
  <img :src="logoUrl" />
  <div>
    <button type="button" @click="count++">count is: {{ count }}</button>
  </div>
+ <a :class="style.link">超链接</a>
</template>

<style scoped>
img {
  width: 100px;
  height: 100px;
}
</style>
-<style module>
-.link {
-  color: red;
-}
-</style>
10.4 预处理器 #
- Vite 也同时提供了对.scss, .sass, .less, .styl 和 stylus文件的内置支持
- 没有必要为它们安装特定的 Vite 插件,但必须安装相应的预处理器依赖
Vite为Sass和Less改进了@import解析,以保证Vite别名也能被使用
10.4.1 安装 #
pnpm install sass less -D10.4.2 src\components\HelloWorld.vue #
src\components\HelloWorld.vue
<script setup lang="ts">
import { ref } from "vue"
import logoUrl from "../assets/logo.png"
import style from "./HelloWorld.module.css"
defineProps<{ msg: string }>()
const count = ref(0)
</script>

<template>
  <h1>{{ msg }}</h1>
  <img :src="logoUrl" />
  <div>
    <button type="button" @click="count++">count is: {{ count }}</button>
  </div>
  <a :class="style.link">超链接</a>
  <h2>less</h2>
  <h3>sass</h3>
</template>

<style scoped>
img {
  width: 100px;
  height: 100px;
}
</style>
<style module>
.link {
  color: red;
}
</style>
+<style scoped lang="less">
+@color: red;
+h2 {
+  color: @color;
+}
+</style>
+<style scoped lang="scss">
+$color: green;
+h3 {
+  color: $color;
+}
+</style>
10.5 全局注入 #
- 可以把全局样式文件全局注入到项目中
10.5.1 vite.config.ts #
vite.config.ts
import { defineConfig } from "vite"
import { resolve } from "path"
import vue from "@vitejs/plugin-vue"
export default defineConfig({
  resolve: {
    alias: {
      "@": resolve("src")
    }
  },
  plugins: [vue()],
+ css: {
+   preprocessorOptions: {
+     scss: {
+       additionalData: '@import "@/styles/theme.scss";'
+     },
+     less: {
+       additionalData: '@import "@/styles/theme.less";'
+     }
+   }
+ }
})
10.5.2 src\styles\theme.less #
src\styles\theme.less
@color: red;10.5.3 src\styles\theme.scss #
src\styles\theme.scss
$color: green;10.5.4 src\components\HelloWorld.vue #
src\components\HelloWorld.vue
<script setup lang="ts">
import { ref } from "vue"
import logoUrl from "../assets/logo.png"
import style from "./HelloWorld.module.css"
defineProps<{ msg: string }>()
const count = ref(0)
</script>

<template>
  <h1>{{ msg }}</h1>
  <img :src="logoUrl" />
  <div>
    <button type="button" @click="count++">count is: {{ count }}</button>
  </div>
  <a :class="style.link">超链接</a>
  <h2>less</h2>
  <h3>sass</h3>
</template>

<style scoped>
img {
  width: 100px;
  height: 100px;
}
</style>
<style module>
.link {
  color: red;
}
</style>
<style scoped lang="less">
-@color: red;
h2 {
  color: @color;
}
</style>
<style scoped lang="scss">
-$color: green;
h3 {
  color: $color;
}
</style>
10.6 PostCSS #
- 为了浏览器的兼容性,有时候我们必须加入-webkit,-ms,-o,-moz 这些前缀
- Trident 内核:主要代表为 IE 浏览器, 前缀为-ms
- Gecko 内核:主要代表为 Firefox, 前缀为-moz
- Presto 内核:主要代表为 Opera, 前缀为-o
- Webkit 内核:产要代表为 Chrome 和 Safari, 前缀为-webkit
- 如果项目包含有效的 PostCSS 配置,它将会自动应用于所有已导入的 CSS
10.6.1 安装 #
pnpm install autoprefixer -D10.6.2 postcss.config.js #
postcss.config.js
module.exports = {
  plugins: [require("autoprefixer")]
}
10.6.3 .browserslistrc #
.browserslistrc
>0.2%
not dead
not op_mini all
10.6.4 HelloWorld.vue #
src\components\HelloWorld.vue
<script setup lang="ts">
import { ref } from "vue"
import logoUrl from "../assets/logo.png"
import style from "./HelloWorld.module.css"
defineProps<{ msg: string }>()
const count = ref(0)
</script>

<template>
  <h1>{{ msg }}</h1>
  <img :src="logoUrl" />
  <div>
    <button type="button" @click="count++">count is: {{ count }}</button>
  </div>
  <a :class="style.link">超链接</a>
  <h2>less</h2>
  <h3>sass</h3>
+ <div class="postcss"></div>
</template>

<style scoped>
img {
  width: 100px;
  height: 100px;
}
</style>
<style module>
.link {
  color: red;
}
</style>
<style scoped lang="less">
@color: red;
h2 {
  color: @color;
}
</style>
<style scoped lang="scss">
$color: green;
h3 {
  color: $color;
}
</style>
+<style scoped>
+.postcss {
+  height: 30px;
+  width: 60px;
+  background-color: orange;
+  transform: rotate(25deg);
+}
+</style>
11.静态资源处理 #
- assets
- 服务时引入一个静态资源会返回解析后的公共路径
11.1 模板引入 #
src\components\HelloWorld.vue
<template>
+ <img src="@/assets/logo.png" style="width: 50px" />
</template>
11.2 JS 中引入 #
src\components\HelloWorld.vue
<script setup lang="ts">
+import logoUrl from "@/assets/logo.png"
</script>
<template>
+ <img :src="logoUrl" style="width: 50px" />
</template>
11.3 CSS 引入 #
src\components\HelloWorld.vue
<template>
+ <div class="logo"></div>
</template>
<style scoped>
.logo {
  width: 50px;
  height: 50px;
  background-image: url(@/assets/logo.png);
  background-size: contain;
}
</style>
11.4 public 目录 #
- public 目录
- 如果有以下需求
- 这些资源不会被源码引用(例如 robots.txt)
- 这些资源必须保持原有文件名(没有经过 hash)
- 那么你可以将该资源放在指定的 public 目录中,它应位于你的项目根目录
- 该目录中的资源在开发时能直接通过 / 根路径访问到,并且打包时会被完整复制到目标目录的根目录下
index.html
<body>
  <img src="/logo.png" style="width:50px" />
</body>
12. mock #
- vite-plugin-mock提供本地和生产模拟服务
- vite 的数据模拟插件,是基于 vite.js 开发的。 并同时支持本地环境和生产环境
12.1 安装 #
pnpm install mockjs vite-plugin-mock -D12.2 vite.config.ts #
vite.config.ts
import { defineConfig } from "vite"
import { resolve } from "path"
import vue from "@vitejs/plugin-vue"
+import { viteMockServe } from "vite-plugin-mock"
export default defineConfig({
  resolve: {
    alias: {
      "@": resolve("src")
    }
  },
+ plugins: [vue(), viteMockServe()],
  css: {
    preprocessorOptions: {
      scss: {
        additionalData: '@import "@/styles/theme.scss";'
      },
      less: {
        additionalData: '@import "@/styles/theme.less";'
      }
    }
  }
})
12.3 mock\auth.ts #
mock\auth.ts
import { MockMethod } from "vite-plugin-mock"
export default [
  {
    url: "/api/currentUser",
    method: "get",
    response: ({ query }) => {
      return {
        code: 0,
        data: "zhufeng"
      }
    }
  }
] as MockMethod[]
13. 封装请求 #
13.1 安装 #
pnpm install axios13.2 mock\auth.ts #
mock\auth.ts
import { MockMethod } from "vite-plugin-mock"
export default [
+ {
+   url: "/api/currentUser",
+   method: "get",
+   response: ({ headers }) => {
+     const { token } = headers
+     return {
+       code: 0,
+       data: token
+     }
+   }
+ },
+ {
+   url: "/api/login",
+   method: "post",
+   response: ({ body }) => {
+     //url body,query headers
+     return {
+       code: 0,
+       data: `${body.username}-token`
+     }
+   }
+ }
] as MockMethod[]
13.3 http.ts #
src\api\http.ts
import axios, { AxiosRequestConfig } from "axios"
axios.defaults.baseURL = "/api"
axios.defaults.timeout = 10000
axios.defaults.headers.post["Content-Type"] = "application/json;charset=UTF-8"
axios.interceptors.request.use(
  (config): AxiosRequestConfig => {
    const token = window.sessionStorage.getItem("token")
    if (token) {
      ;(config.headers = config.headers || {}).token = token
    }
    return config
  },
  (error) => {
    throw error
  }
)
// 响应拦截
axios.interceptors.response.use((res) => {
  return res.data
})

export default axios
13.4 src\api\auth.ts #
src\api\auth.ts
import http from "./http"
import { LoginParams } from "@/typings/auth"
export function login(loginParams: LoginParams) {
  return http.post("/login", loginParams)
}
export function getCurrentUser() {
  return http.get("/currentUser")
}
13.5 auth.ts #
src\typings\auth.ts
export interface LoginParams {
  username: string
  password: string
}
export interface Response {
  code: number
  data: any
}
13.6 src\request.ts #
src\request.ts
import { LoginParams, Response } from "@/typings/auth"
import { login, getCurrentUser } from "@/api/auth"
const loginParams: LoginParams = { username: "zhufeng", password: "123456" }
login(loginParams).then((result) => {
  const token = result.data
  window.sessionStorage.setItem("token", token)
  getCurrentUser().then((result) => {
    console.log(result.data)
  })
})
13.7 main.ts #
src\main.ts
import { createApp } from "vue"
import App from "./App.vue"
import "./global.css"
+import "@/request"
const app = createApp(App)
app.mount("#app")
14. 状态管理 #
14.1 安装 #
pnpm install pinia14.2 src\main.ts #
src\main.ts
import { createApp } from "vue"
import App from "./App.vue"
import "./global.css"
import "@/request"
+import { createPinia } from "pinia"
const app = createApp(App)
+app.use(createPinia())
app.mount("#app")
14.3 store\index.ts #
src\store\index.ts
import { defineStore } from "pinia"

export const useMainStore = defineStore({
  id: "main",
  state: () => ({
    count: 0,
    firstName: "张",
    lastName: "三"
  }),
  //计算属性
  getters: {
    name: (state) => state.firstName + state.lastName
  },
  actions: {
    async addAmount(amount: number) {
      this.count += amount
    }
  }
})
14.4 HelloWorld.vue #
src\components\HelloWorld.vue
<script setup lang="ts">
import { ref } from "vue"
import logoUrl from "../assets/logo.png"
import style from "./HelloWorld.module.css"
+import { useMainStore } from "@/store"
+import { storeToRefs } from "pinia"
+defineProps<{ msg: string }>()
+const count = ref(0)
+const mainStore = useMainStore()
+//const storeCount = mainStore.count
+const { count: storeCount } = storeToRefs(mainStore)

+const add = () => {
+  //适合多字段改变
+  mainStore.$patch({
+    name: "arch",
+    count: mainStore.count + 1
+  })
+}
+const add2 = () => {
+  //适合多字段改变
+  mainStore.$patch((state) => ({
+    name: "arch2",
+    count: mainStore.count + 2
+  }))
+}
</script>

<template>
  <h1>{{ msg }}</h1>
  <img :src="logoUrl" />
  <div>
    <button type="button" @click="count++">count is: {{ count }}</button>
  </div>
  <a :class="style.link">超链接</a>
  <h2>less</h2>
  <h3>sass</h3>
  <div class="postcss"></div>
+ <div>
+   <p>name:{{ mainStore.name }}</p>
+   <p>count:{{ mainStore.count }}</p>
+   <p>count:{{ storeCount }}</p>
+   <button @click="mainStore.count++">mainStore.count++</button>
+   <button @click="add()">add()</button>
+   <button @click="add2()">add2()</button>
+   <button @click="mainStore.addAmount(3)">mainStore.addAmount(3)</button>
+   <p>name:{{ mainStore.name }}</p>
+ </div>
</template>

<style scoped>
img {
  width: 100px;
  height: 100px;
}
</style>
<style module>
.link {
  color: red;
}
</style>
<style scoped lang="less">
@color: red;
h2 {
  color: @color;
}
</style>
<style scoped lang="scss">
$color: green;
h3 {
  color: $color;
}
</style>
<style scoped>
.postcss {
  height: 30px;
  width: 60px;
  background-color: orange;
  transform: rotate(25deg);
}
</style>
15. 路由 #
15.1 安装 #
pnpm install vue-router15.2 router\index.ts #
src\router\index.ts
import { createRouter, createWebHistory, RouteRecordRaw } from "vue-router"

const routes: RouteRecordRaw[] = [
  {
    path: "/",
    name: "home",
    component: () => import("@/pages/HomePage.vue")
  },
  {
    path: "/login",
    name: "login",
    component: () => import("@/pages/LoginPage.vue")
  }
]

const router = createRouter({
  history: createWebHistory(),
  routes
})

export default router
15.3 HomePage.vue #
src\pages\HomePage.vue
<template>
  <h1>Home</h1>
</template>
15.4 LoginPage.vue #
src\pages\LoginPage.vue
<template>
  <form>
    用户名 <input />
  </form>
</template>
15.5 src\main.ts #
src\main.ts
import { createApp } from "vue"
import App from "./App.vue"
import "./global.css"
import "@/request"
import { createPinia } from "pinia"
+import router from "./router"
const app = createApp(App)
app.use(createPinia())
+app.use(router)
app.mount("#app")
15.6 App.vue #
src\App.vue
<script setup lang="ts">
import HelloWorld from "@/components/HelloWorld.vue"
import msg from "./msg"
</script>

<template>
+  <router-view></router-view>
</template>

<style></style>
16. UI 组件库 #
16.1 安装 #
pnpm install naive-ui vfonts @vicons/ionicons516.2 src\App.vue #
- Non-function value encountered for default slot. Prefer function slots for better performance. src\App.vue
- slot用于具名插槽
<script setup lang="ts">
import HelloWorld from "@/components/HelloWorld.vue"
import msg from "./msg"
+import { h, Component } from "vue"
+import { NIcon, NMenu } from "naive-ui"
+import type { MenuOption } from "naive-ui"
+import { RouterLink } from "vue-router"
+import { HomeOutline, LogInOutline } from "@vicons/ionicons5"
+const menuOptions: MenuOption[] = [
+  {
+    label: () =>
+      h(RouterLink, { to: { name: "home" } }, { default: () => "首页" }),
+    key: "home",
+    icon: () => h(NIcon, null, { default: () => h(HomeOutline) }) //带有插槽的对象
+  },
+  {
+    label: () =>
+      h(RouterLink, { to: { name: "login" } }, { default: () => "登录" }),
+    key: "login",
+    icon: () => h(NIcon, null, { default: () => h(LogInOutline) })
+  }
+]
</script>

<template>
+  <n-menu :options="menuOptions" />
  <router-view></router-view>
</template>

<style></style>
17. 环境变量和模式 #
- Vite 在一个特殊的 import.meta.env 对象上暴露环境变量
- import.meta.env.MODE: {string} 应用运行的模式
- import.meta.env.BASE_URL: {string} 部署应用时的基本 URL。他由 base 配置项决定
- import.meta.env.PROD: {boolean} 应用是否运行在生产环境
- import.meta.env.DEV: {boolean} 应用是否运行在开发环境 (永远与 import.meta.env.PROD 相反)
17.1 .env.development #
VITE_APP_WEB_URL = "/dev"17.2 .env.production #
VITE_APP_WEB_URL = "/prod"17.3 src\main.ts #
+console.log(import.meta.env)17.4 package.json #
package.json
{
  "scripts": {
+    "build:dev": "vue-tsc --noEmit && vite build --mode development",
+    "build:prod": "vue-tsc --noEmit && vite build --mode production",
  },
}