1. VSCODE #
1.1 使用node启动调试 #
{
    "type": "node",
    "request": "launch",
    "name": "启动程序",
    "program": "E:/cli.js"
}- VSCODE
1.2 保存时自动格式化 #
File->Preferences->User Settings{ "editor.formatOnType": false, "editor.formatOnSave": false }
1.3 语言改为英文 #
快捷键Command+Shift+P(Win下为Control)打开命令行工具,输入设置语言,会打开一个locale.json的文件,如下面所示
{ // 定义 VSCode 的显示语言。 // 请参阅 http://go.microsoft.com/fwlink/?LinkId=761051,了解支持的语言列表。 // 要更改值需要重启 VSCode。 "locale":"zh-CN" } 将locale的值改为en-US之后重启VSCode就恢复到英文版本的了!
1.4 快捷键 #
- 列选择 alt+shift+左键
- 多点编辑 按alt点击左键
格式化 Alt+shift+f
ctrl+shift+o 查找Symbol
- ctrl+g 定位到某一行
- 前进后退侧边键
- ctrl+k+0 折叠所有的方法
ctrl+k+] 打开当前的方法
outline
1.5 单行注释 #
单行注释
//.+?(?=["$\r\n]1.6 多行注释 #
\/\*([\w\W]+?)\*\/1.7 空行 #
^\s*(?=\r?$)\n1.8 全部替换 #
((\/\*([\w\W]+?)\*\/)|(\/\/.+?(?=["$\r\n]))|(^\s*(?=\r?$)\n))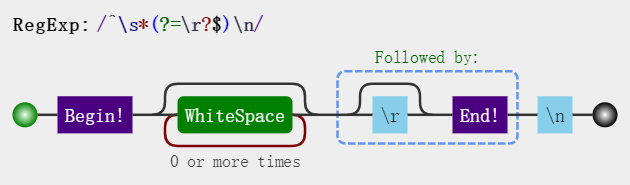
| 表达式 | 含义 |
|---|---|
| (?:) | 表示非捕获分组,和捕获分组唯一的区别在于,非捕获分组匹配的值不会保存起来 |
| (?=pattern) | 正向肯定查找(前瞻),后面必须跟着什么 |
1.9 rm-js-comment #
{
 "__WEBPACK": "",
 "__webpack_handle_async_dependencies__": "async_dependencies",
 "IMPORTED_MODULE_": "",
 "__WEBPACK_DEFAULT_EXPORT__": "DEFAULT_EXPORT",
 "__webpack_exports__": "exports",
 "__unused_webpack_module": "module",
 "__WEBPACK_EXTERNAL_MODULE_": "EXTERNAL_MODULE_",
 "__WEBPACK_DYNAMIC_EXPORT__": "DYNAMIC_EXPORT",
 "__system_context__": "system_context",
 "__webpack_require__": "require",
 "__webpack_module_cache__": "cache",
 "__webpack_modules__": "modules",
 "__WEBPACK_IMPORTED_MODULE_": "_IMPORTED_MODULE_",
 "/*#__PURE__*/": "",
 "___EXPOSE_LOADER_IMPORT___": "EXPOSE_IMPORT",
 "___EXPOSE_LOADER_GET_GLOBAL_THIS___": "GET_GLOBAL_THIS",
 "___EXPOSE_LOADER_GLOBAL_THIS___": "GLOBAL_THIS"
}
1.10 git #
1. 查看当前登录账号:
git config user.name

2. 查看当前登录邮箱:
git config user.email

3. 修改用户名和邮箱:
git config --global user.name "Your_username"
git config --global user.email "Your_email"

git config  user.name "zhangrenyang"
git config  user.email "zhang_renyang@126.com"
1.11 缩进4个空格 #
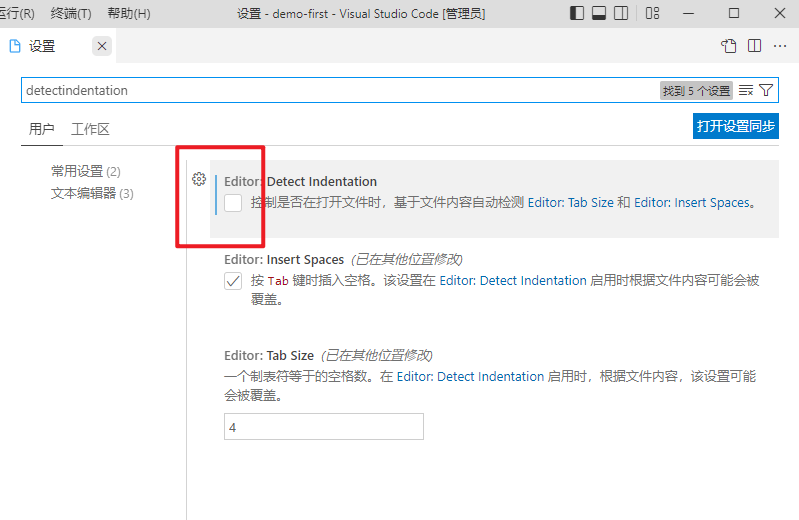
- vscode 的设置中 detectindentation 没有去掉,导致打开的时候 vscode 会自动检查代码的空格风格,认为是2个空格,导致我们设置的4个空格的缩进失效。
- 打开设置,搜索 detectindentation ,找到 Editor: Detect Indentation 选项, 将前面 勾选去掉 。(如下图所示)
1.12 找不到项目 #
- 新建批处理文件 ,把找不到项目的文件拖进去就可以了
DEL /F /A /Q \\?\%1
RD /S /Q \\?\%1
DEL命令是用来删除文件的。
/F 参数表示强制删除,即使文件被指定为只读
/A 参数表示根据文件属性删除文件
/Q 参数表示不询问确认
\?%1 表示删除的文件路径
RD命令是用来删除目录的。
/S 参数表示删除目录及其子目录和文件
/Q 参数表示不询问确认
\?%1 表示删除的目录路径
总的来说,这个批处理命令的作用是强制删除文件或目录,并不询问确认。
"\?" 是 Windows 中的一种特殊前缀,它用于表示长路径。当在文件路径前面加上 "\?" 前缀时,文件路径的长度限制将会被忽略。
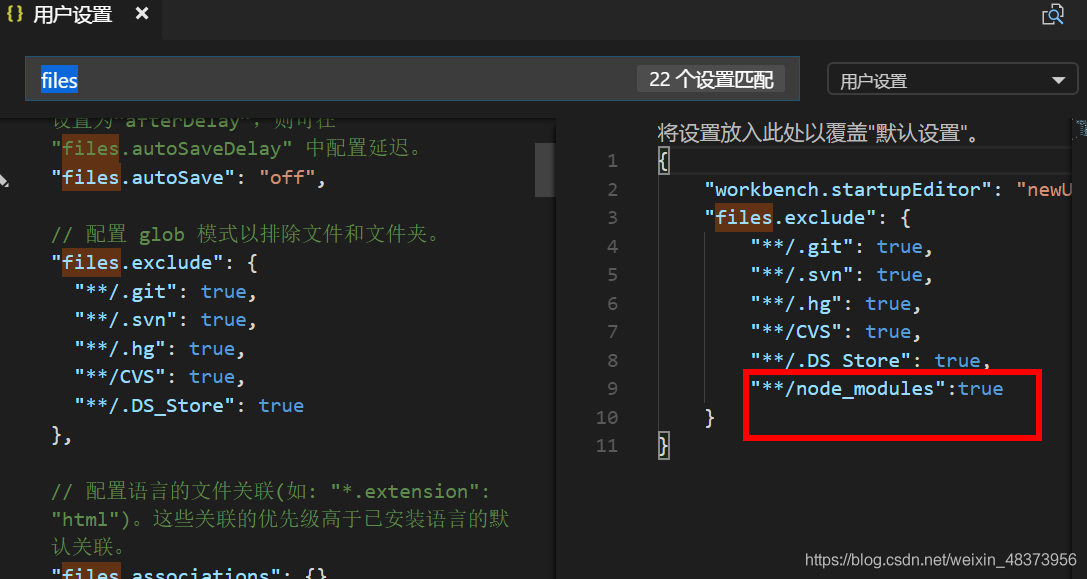
%1 是批处理命令中的一个参数占位符,它表示第一个命令行参数。所以 \?%1 是一个文件路径参数,他是长路径的形式。13.Explorer: Auto Reveal Exclude #
Configure glob patterns for excluding files and folders from being revealed and selected in the Explorer when they are opened. Read more about glob patterns here.
2.MAC #
2.1 杀死进程 #
查看进程占用
lsof -i tcp:8080 该命令会显示占用8080端口的进程,有其 pid ,可以通过pid关掉该进程
kill pid2.2 查看端口占用 #
2.2.1 lsof #
lsof -i:portlsof -i:80802.2.2 netstat #
netstat -antp | grep portnetstat -antp | grep 80802.2.3 Windows平台 #
在windows命令行窗口下执行:
C:/>netstat -aon|findstr "80"
TCP    127.0.0.1:80        0.0.0.0:0              LISTENING      2448
3.安装需要编译包 #
3.1 安装sharp #
- sharp是一个高性能的nodejs图像处理库
- 安装sharp
- 安装过程中遇到sharp安装慢
- sharp-libvips
npm config set sharp_binary_host "https://npm.taobao.org/mirrors/sharp"
npm config set sharp_libvips_binary_host "https://npm.taobao.org/mirrors/sharp-libvips"
npm install sharp
3.2 编译 #
- node-gyp#on-windows
- windows-build-tools
- python
3.2 cache目录 #
- NPM会把所有下载的包保存,放在用户文件夹下面,在我的windows10机器上是保存在C:\Users\Administrator\AppData\Roaming\npm-cache下面
- NPM install之后会计算每个包的sha1值,然后将包与他的sha1值关联保存在package.lock.json里面
- 下次NPM install的时候会根据package.lock.json里面保存的sha1值去文件夹C:\Users\Administrator\AppData\Roaming\npm-cache里面寻找包文件,如果存在,就不用再次从网上下载安装包
- NPM cache verify 重新计算C:\Users\Administrator\AppData\Roaming\npm-cache下的文件是否与sha1值匹配,如果不匹配可能删除?
- NPM cache clean --force 这个命令从C:\Users\Administrator\AppData\Roaming\npm-cache下删除所有缓存文件
NPM不同版本算出来的sha1貌似不完全一样,所以直接用别人的package.lock.json会报sha1不匹配的error
yarn cache list查看缓存的包yarn cache dir查询cache缓存文件目录路径yarn cache cleanyarn 清除缓存npm cache clean --forcenpm清除缓存
4.Yarn #
| 命令 | 说明 |
|---|---|
| yarn -v | 查看yarn版本 |
| yarn config list | 查看yarn的所有配置 |
| yarn config set registry https://registry.npm.taobao.org/ | 修改yarn的源镜像为淘宝源 |
| yarn config set global-folder "D:\RTE\Yarn\global" | 修改全局安装目录, 先创建好目录(global), 我放在了Yarn安装目录下(D:\RTE\Yarn\global) |
| yarn config set prefix "D:\RTE\Yarn\global\" | 修改全局安装目录的bin目录位置 |
| yarn config set cache-folder "D:\RTE\Yarn\cache" | 修改全局缓存目录, 先创建好目录(cache), 和global放在同一层目录下 |
| yarn config list | 查看所有配置 |
| yarn global bin | 查看当前yarn的bin的位置 |
| yarn global dir | 查看当前yarn的全局安装位置 |
5.lerna #
| 命令 | 功能 |
|---|---|
| lerna bootstrap | 安装依赖 |
| lerna clean | 删除各个包下的node_modules |
| lerna init | 创建新的lerna库 |
| lerna list | 查看本地包列表 |
| lerna changed | 显示自上次release tag以来有修改的包, 选项通 list |
| lerna diff | 显示自上次release tag以来有修改的包的差异, 执行 git diff |
| lerna exec | 在每个包目录下执行任意命令 |
| lerna run | 执行每个包package.json中的脚本命令 |
| lerna add | 添加一个包的版本为各个包的依赖 |
| lerna import | 引入package |
| lerna link | 链接互相引用的库 |
| lerna create | 新建package |
| lerna publish | 发布 |
6.yarn #
| 作用 | 命令 |
|---|---|
| 查看工作空间信息 | yarn workspaces info |
| 给根空间添加依赖 | yarn add chalk cross-spawn fs-extra --ignore-workspace-root-check |
| 给某个项目添加依赖 | yarn workspace create-react-app3 add commander |
| 删除所有的 node_modules | lerna clean 等于 yarn workspaces run clean |
| 安装和link | yarn install 等于 lerna bootstrap --npm-client yarn --use-workspaces |
| 重新获取所有的 node_modules | yarn install --force |
| 查看缓存目录 | yarn cache dir |
| 清除本地缓存 | yarn cache clean |
7.调试命令 #
.vscode\launch.json
{
    "version": "0.2.0",
    "configurations": [
        {
            "type": "node",
            "request": "launch",
            "name": "vue-cli",
            "cwd":"${workspaceFolder}",
            "runtimeExecutable": "npm",
            "runtimeArgs": [
                "run",
                "create"
            ],
            "port":9229,
            "autoAttachChildProcesses": true,
            "stopOnEntry": true,
            "skipFiles": [
                "<node_internals>/**"
            ]
        }
    ]
}
8.配置alias #
Create React App无eject配置 打包成相对路径配置 在package.json中增加:
"homepage": "."9.解决vscode卡顿问题 #
vscode在任务管理器观察CPU占用率100% 解决方案 VScode中文件->首选项->设置 ,之后搜索"search.followSymlinks":true,然后设置为false
10. window编译C++ #
10.1 Python executable python2 in the PATH #
- npm install 报错 check python checking for Python executable python2 in the PATH
- 删除 node_modules 文件夹
- 在 Terminal 运行
npm install --global windows-build-tools --save - 再安装
npm install node-sass --save - 到这里,错误应该就已经解决了,收到了
gyp info ok的提示! - 如果遇到
Node Sass could not find a binding for your current environment,再运行npm rebuild node-sass就可以了
10.2 getaddrinfo ENOENT raw.githubusercontent.com #
- 点开网址 https://www.ipaddress.com/ ,输入
raw.githubusercontent.com,点击查询: - 修改hosts文件
C:\Windows\System32\drivers\etc\hostsip raw.githubusercontent.com - npm install
10.3 npm ERR! gyp verb which failed Error: not found: python2 #
- npm config set python
C:/Python27/python.exe
10.4 #
npm ERR! gyp ERR! stack Error: spawn C:\Program Files (x86)\Microsoft Visual Studio\2019\BuildTools\MSBuild\15.0\Bin\MSBuild.exe ENOENT
npm cache clean --force
C:\Users\zhangrenyang\AppData\Roaming\npm\node_modules\node-gyp\gyp\pylib\gyp\MSVSVersion.py
npm audit fix
11. .npmr镜像 #
mirror config #
sharp_dist_base_url = https://npm.taobao.org/mirrors/sharp-libvips/v8.9.1/ profiler_binary_host_mirror = https://npm.taobao.org/mirrors/node-inspector/ fse_binary_host_mirror = https://npm.taobao.org/mirrors/fsevents node_sqlite3_binary_host_mirror = https://npm.taobao.org/mirrors sqlite3_binary_host_mirror = https://npm.taobao.org/mirrors sqlite3_binary_site = https://npm.taobao.org/mirrors/sqlite3 sass_binary_site = https://npm.taobao.org/mirrors/node-sass electron_mirror = https://npm.taobao.org/mirrors/electron/ puppeteer_download_host = https://npm.taobao.org/mirrors chromedriver_cdnurl = https://npm.taobao.org/mirrors/chromedriver operadriver_cdnurl = https://npm.taobao.org/mirrors/operadriver phantomjs_cdnurl = https://npm.taobao.org/mirrors/phantomjs python_mirror = https://npm.taobao.org/mirrors/python registry = https://registry.npm.taobao.org/ disturl = https://npm.taobao.org/dist
git config --global http.proxy "127.0.0.1:33210"
12. clean-react-source #
- clean-react-source
clean-react-source **/*.js
13. robotjs #
13.1 下载python #
13.2 下载node-gyp #
13.3 下载BuildTools #
npm config set msvs_version 2019- 使用C++的桌面开发
- Node.js生成工具
13. detach_node_modules #
npm install detach_node_modules -g
detach
14.关闭百度热点 #
www.baidu.com##img[id="s_lg_img"]
www.baidu.com##div[id="s_mancard_main"]
www.baidu.com##div[id="s-top-left"]
www.baidu.com##div[id="s_lm_wrap"]
www.baidu.com##div[tpl="right_toplist1"]
www.baidu.com##div[id="content_right"]
www.baidu.com##li[class="hotsearch-item odd"]
www.baidu.com##li[class="hotsearch-item even"]
www.baidu.com##a[id="hotsearch-refresh-btn"]
www.baidu.com##a[id="lm-new"]
www.baidu.com##div[class="title-text c-font-medium c-color-t"]

under-searchbox-tips
15.安装软件 #
16.ESM #
17 github #
配置hosts文件 C:\Windows\System32\drivers\etc\HOSTS
GitHub Start #
140.82.112.3 github.com 140.82.114.4 gist.github.com 185.199.108.153 assets-cdn.github.com 185.199.108.133 raw.githubusercontent.com 185.199.108.133 gist.githubusercontent.com 185.199.108.133 cloud.githubusercontent.com 185.199.108.133 camo.githubusercontent.com 185.199.108.133 avatars.githubusercontent.com 185.199.108.133 avatars0.githubusercontent.com 185.199.108.133 avatars1.githubusercontent.com 185.199.108.133 avatars2.githubusercontent.com 185.199.108.133 avatars3.githubusercontent.com 185.199.108.133 avatars4.githubusercontent.com 185.199.108.133 avatars5.githubusercontent.com 185.199.108.133 avatars6.githubusercontent.com 185.199.108.133 avatars7.githubusercontent.com 185.199.108.133 avatars8.githubusercontent.com
GitHub End #
18.把ts变为js #
npm install strip-typescript -g
strip-typescript src/**/*.ts


npm install strip-flowtype -g
strip-flowtype src/**/*.js
19.cra支持@别名 #
20.规范手册 #
21.快速键 #
- Ctrl 逐词 Shift 选择
- 逐词移动 ctrl+方向
- 逐词删除 ctrl+delete
- 逐词选择 ctrl+shift+方向
- 选择一行 end->shift+home
- 选择同样 ctrl+d
- 区块选择 shift+alt+右
22. detach_node_modules #
npm install deletesomefiles -g

deletesomefiles  ".map"
deletesomefiles "/.+\.map/"
deletesomefiles '["/.+\.map/",".+\.js"]'

deletesomefiles  ".git"